Wine Glass Coaster Prototype Made With Plastic Injection Molding
Services
Manufacturing Processes: CNC machining, EDM and Wire EDM, Polishing, Painting, Plastic Injection Molding
Product Material: High-impact K-Resin PB-5925
Tooling Material: NAK80 tool steel
Prototype Order Volume: 8 pieces
Tooling Order Volume: One set for export
About the Product
Glass on the Grass is an innovative coaster designed to slip onto the base of a wine glass and provide a wide, stable support on flat uneven surfaces such as grass. Designed for picnics and outdoor living, the product works equally well around pools, BBQs and the beach. They’re durable, reusable, stackable, lightweight, washable, and come in a variety of refreshing colors.
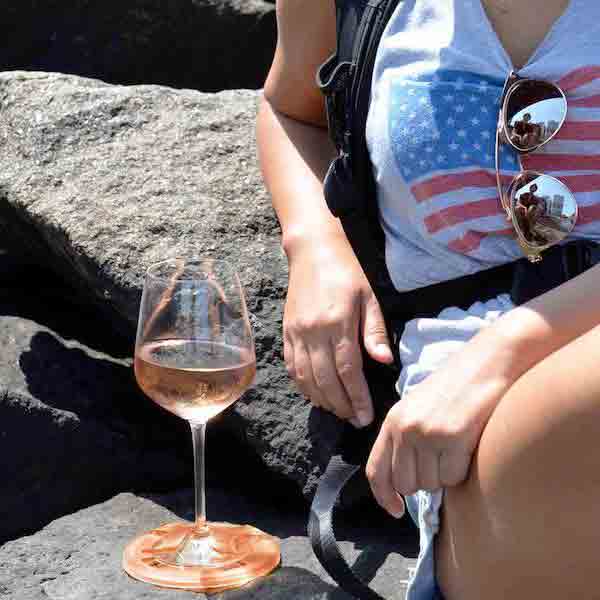
WIne Glass Base For All Occasions
About The Product Developers
The team at Breathe Create are born problem solvers. They design practical user-friendly lifestyle products that just plain work. Innovative design, social responsibility and a love of the great outdoors sums them up. Stephen from Breathe Create contacted us for support in making a prototype for their product Glass on the Grass.
“Finding world class partners who understand how to work with boutique product design business is vital. We certainly made the right choice to work with Michigan CNC Machining Parts, Inc.. The team understood what we wanted to achieve, loved our concept and were determined to help us bring it to life. Without our partners, Glass on the Grass™ would still be just a great idea.”
About The Project
After not being satisfied with the quality and service during the initial prototyping with another supplier, they approached us in search of high quality results. They needed rapid prototypes to test out their concept, improve its manufacturability and calculate pricing. Following a very successful prototyping stage we worked together to make a set of production-ready plastic injection mold tools for export.
Watch How It Was Made
Article continues below the video.
Making The Prototypes
We made a set of prototypes using multi-axis CNC machine centers and clear acrylic plastic. CNC machining lets us create accurate and highly finished parts quickly and without an expensive investment in tooling. Prototypes like these are fully functional and low-cost. Prototypes are invaluable for improving on a product’s design, looking at different color schemes, planning costs and gauging market response.
Making these prototypes was a multi-step process. It involved creating a g-code cutting program from the client’s 3D CAD data; milling the parts; sanding and polishing in our model shop; measurement in our QC and inspection department; and finally, careful hand-painting and texturing in our dedicated paint room. The results look as good as full production parts.
Hand Painted Prototypes
During plastic injection molding, the surface texture will be transferred from the mold to the finished part. On the prototypes we achieved a similar result with hand painting, but of course that’s not practical for volume production.

The prototypes were hand painted and checked with a comparator.
Design For Manufacturing Review
Our tooling engineering team worked closely with Threedom to optimize the design for manufacturability and product quality. After all, designing an injection mold tool is much different than making a machined prototype. These are some of the main areas we addressed in our Design For Manufacturing review.
Analyzing Wall Thickness
We used sophisticated modeling software to help us analyze the part and resolve issues before the tool was made. When using plastic injection molding for production, it’s critical to identify any areas where adjacent wall thicknesses are not uniform or that change in thickness too abruptly. Such areas can cause potential defects because they cool at different rates.
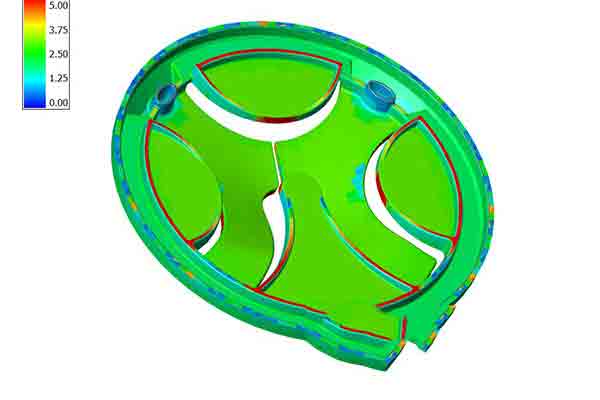
Wall thickness analysis
Locating The Gate
The gate is where molten plastic enters the tool cavity to fill it. We tried to locate them where they’re least obtrusive but were still able to fill the cavity uniformly. This area left a small cosmetic mark on the part which we later sanded smooth.
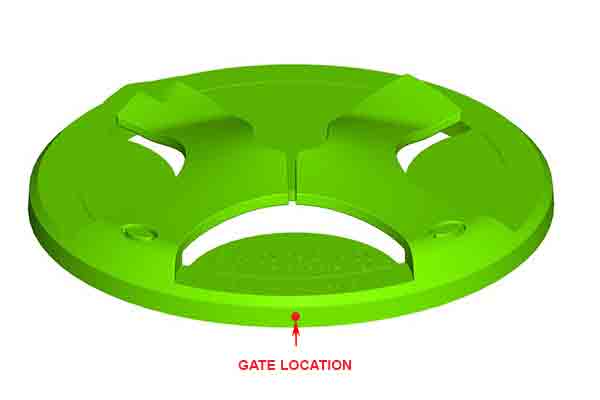
Gates should be located in areas which won’t affect the cosmetic finish.
Calculating Draft Angles
Draft angles are necessary to release the part from the mold in the direction that the mold opens, or the “draw”. We recommended a relatively large draft angle, as well as additional ejector pins to push the part free.
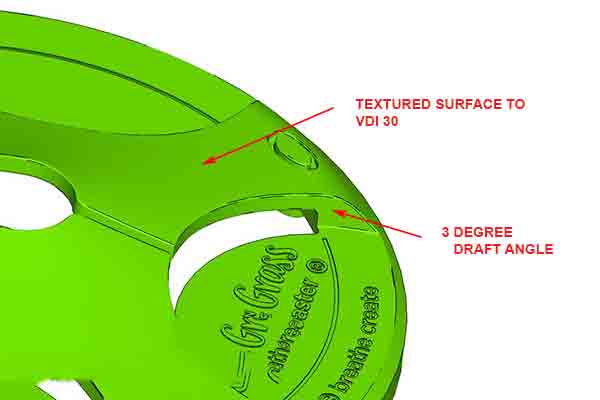
A draft angle of 3 deg. is acceptable if the surface finish is smooth.
Locating Ejector Pins
Ejector pins are retractable, and are used to push the part off of the core after molding. Because they leave a characteristic circular mark on the piece, we located them on the back side, at the intersections where narrow walls meet.
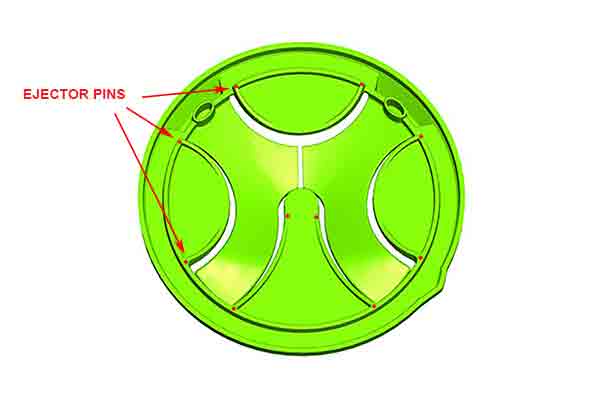
Ejector pins must be strategically located around the part.
Preparing the Lettering
Debossed letters are recessed into the surface, making them clearly legible. However, they can lose fidelity if they’re too narrow and also be hard to release, so we recommended a minimum width of .4 mm.
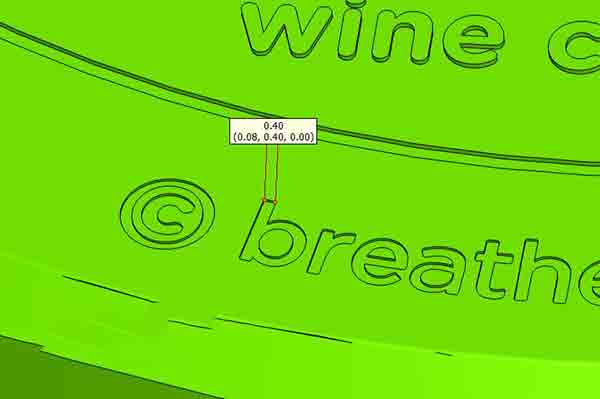
These letters are carefully machined into the tool steel using EDM.
Preparing The Tool
A quality production mold tool must withstand tons of pressure while being heated and cooled thousands of times in succession, all while maintaining close tolerances. This requires a careful orchestration of hundreds of parts working together seamlessly.
Fully Assembled Mold
We designed the plastic injection mold tools to fit inside our standard Master Unit Die (MUD). These bases are designed to be interchangeable among all of our injection molding machines. Here a completed, closed mold looks fairly simple.
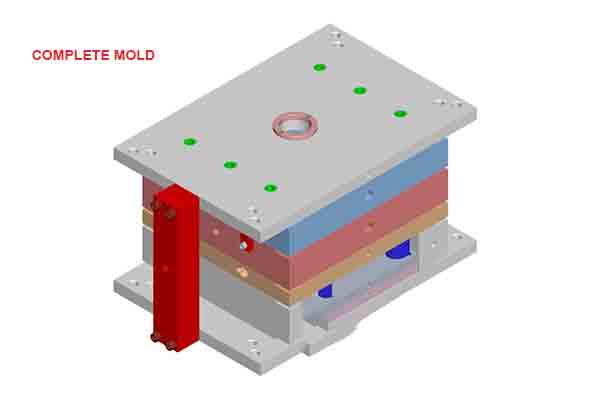
A complete tool consists of a core side and cavity side, mounted between plates inside of a modular base.
Complete Mold, Exploded View
Return springs, guide bushings, ejector pins, check rings and many other components must all work together smoothly to ensure a quality finished part, time after time. The two main parts that form the part’s shape are called the cavity and the core.

Here the mold is exploded to show the relationship of all the parts.
Detail of the Mold Cavity
The A-side of the mold is connected to the nozzle of the injection molding machine. Molten resin under pressure enters the sprue and is distributed along the runner channels, passes through the gates and fills the empty cavity. This mold is capable of making four parts during each cycle, so this is a “four-cavity mold”.
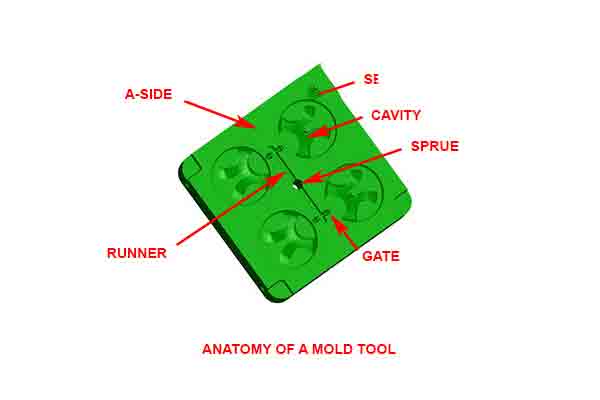
The A-side is usually the cavity, and functions as the cosmetic face of the part.
Detail of the Mold Core
We used a multi-axis CNC mill to cut the complex contours of the part’s shape. We also polished the surface of the core, or B-side, so that the part released cleanly after molding. This formed the bottom, or non-cosmetic, side of the part. We used NAK80 semi-hardened tool steel, which is more expensive than aluminum but takes a high polish and is much more durable for large volumes of parts.
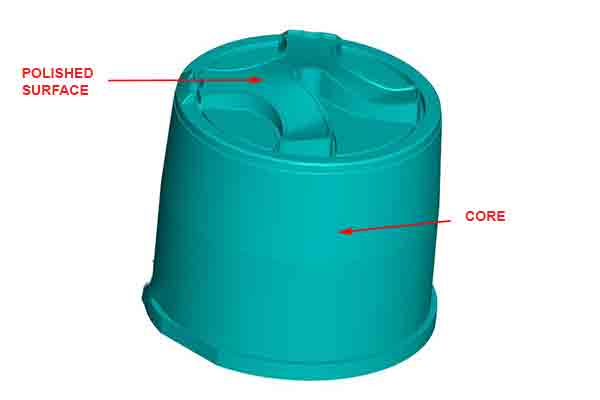
NAK80 tool steel takes a high polish and is very durable.
Testing The Mold
We made this tool to be exported to the client, which means that they will do the volume production themselves. However, we couldn’t release the tool until we had carefully tested both it and the thermoforming resin.
Injection Molding Die, Core Side
In most injection molding machines, it’s the B-side, or core, that opens and closes during each injection cycle, while the A-side remains fixed to the sprue and nozzle assembly from which plastic is injected.
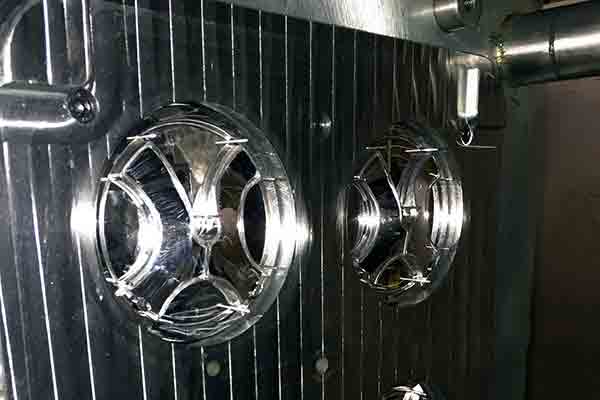
The core, or B-side of the mold.
Injection Molding Die, Cavity Side
We carefully textured the inner surface of the cavity, to a finish roughness of VDI 30. VDI is a standard way to measure roughness by gauging against a set of comparators. Although this kind of texture can be done with EDM machining in a mold cavity, we used a chemical photoetching process for best results. Notice also the gate and runner system used to deliver the liquid resin into the cavities.
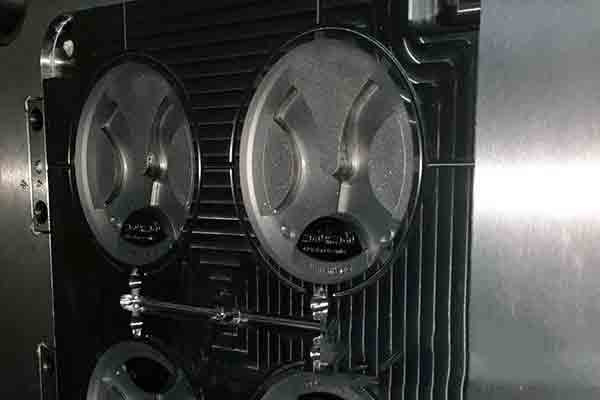
The cavity side, showing the textured front surface.

Glass on the Grass is an outstanding success. In less than a month we are already shipping all over Australia and to the UK, USA, Mainland Europe and Asia….Michigan CNC Machining Parts, Inc.’s high-quality prototypes enabled us to launch our marketing campaign ahead of production which has paid great dividends and has been a great resource for our social media profiles.

Perfect for picnics
Ready To Start Your Next Project?

Chris Williams is the Content Editor at Michigan CNC Machining Parts, Inc.. He is passionate about writing and about developments in science, manufacturing and related technologies. He is also a certified English grammar snob.